The size of a leather patch does more to make or break a hat than almost any other decision. A patch that is too large fights the seams and curves of the cap and looks like it was stuck on as an afterthought; one that is too small floats in the middle of the panel and reads as timid. The right size depends on the hat style you are building on, and the right placement depends on how that style is constructed. This walkthrough gives working dimensions for each common blank and shows how to specify a patch that sits like it belongs there.
Why hat style drives patch size
Every hat gives you a different canvas. A structured trucker holds its shape with a stiff buckram front panel, so it presents a broad, flat area that can carry a large patch without wrinkling. A dad hat or other unstructured cap has a soft, lower-profile front that curves with the head, which shrinks the flat area available and makes an oversized patch buckle at the edges. A beanie has no front panel at all in the usual sense; the patch lives on the folded cuff, a narrow band that limits height more than width. Because the usable area changes so much between these, a single patch size cannot look right on all of them, and matching size to style is the first move.
Bigger is not automatically bolder. On a low-profile cap, going up a size often just crowds the panel and forces the patch over a seam, where the adhesive or stitching has to bridge a ridge and the leather can lift. Sizing down slightly to sit cleanly within the flat area usually looks more intentional than cramming in the largest patch that will physically fit.
Working dimensions by blank
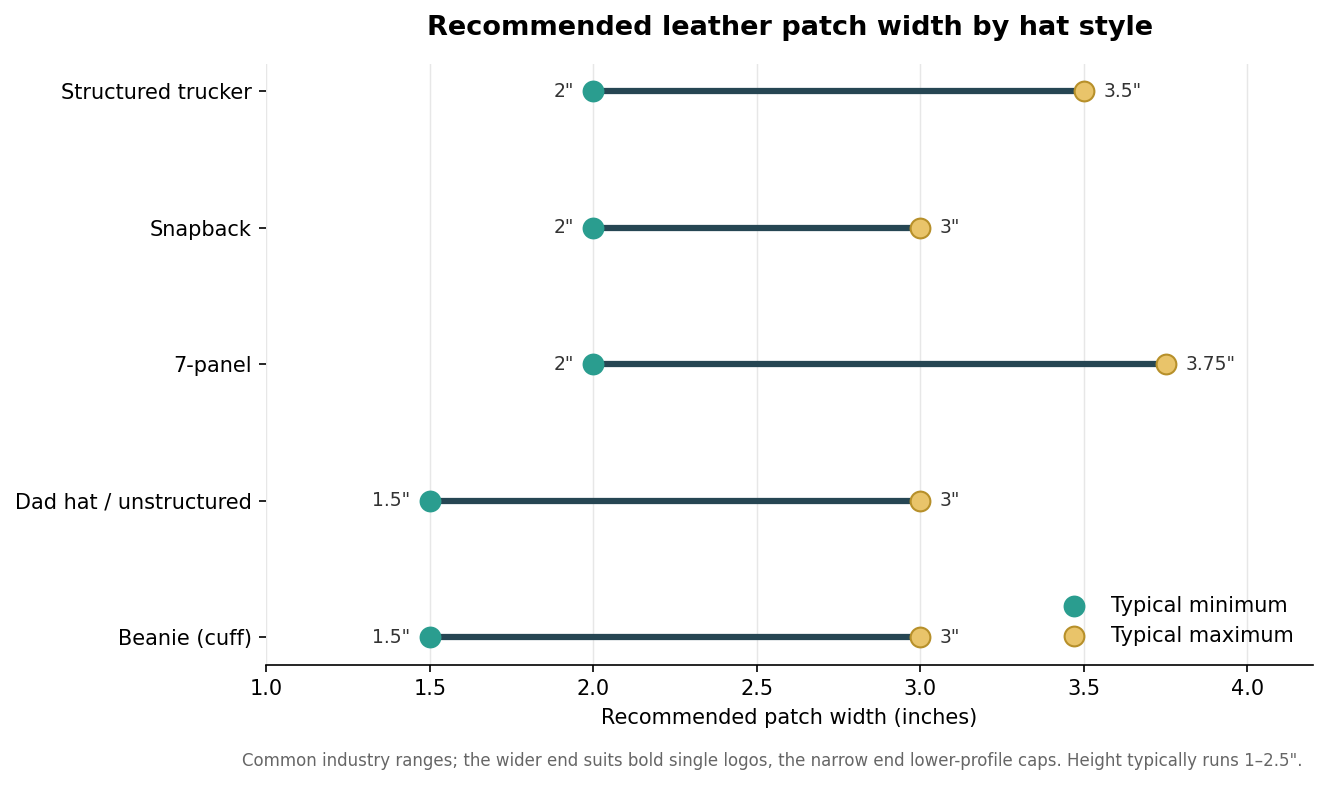
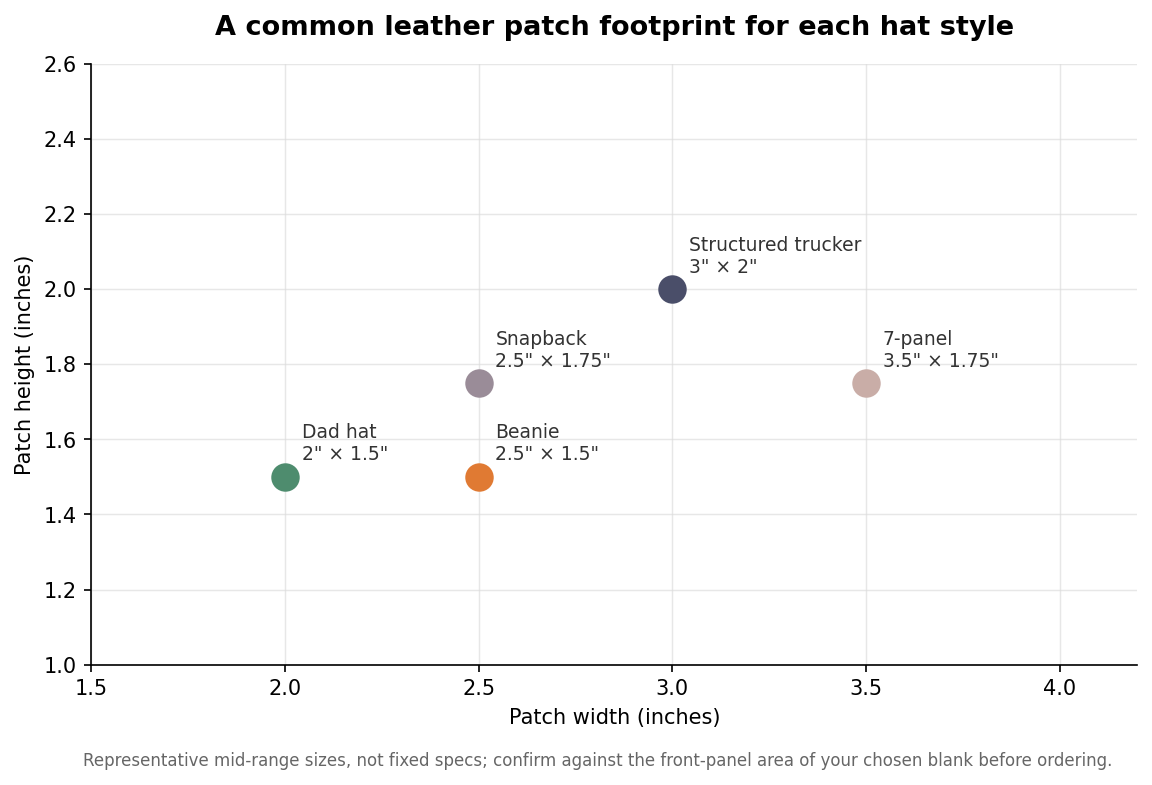
For structured trucker caps and snapbacks, the front panel comfortably takes a patch in the range of about two to three and a half inches wide by roughly one to two and a half inches tall, with something near three inches by two inches being a dependable, confident default for a single logo. Seven-panel caps, which have a slightly taller and flatter front, can carry the widest patches of all, up to around three and three-quarter inches, which is why they suit wide wordmarks. Snapbacks look best with a medium patch that respects the flat-brim, structured aesthetic rather than dominating it.
Dad hats and unstructured caps call for a smaller patch, roughly one and a half to three inches wide by one to two inches tall, with a two-inch footprint being a natural fit for a compact logo. Beanies use a similar width range on the cuff but are constrained in height, so a short, wide rectangle or a small round reads better than a tall shape. Across all of these, round patches around two to two and a quarter inches are a versatile choice when the logo is circular. Treat these as starting ranges rather than fixed rules, and always confirm the patch against the actual front-panel area of the specific blank you have chosen, since panel dimensions differ between manufacturers.
Getting placement right
Placement is where a correctly sized patch either lands or misses. On a front-panel cap, center the patch horizontally on the panel; a large patch in particular needs to be centered to look balanced, while a small round has more freedom to sit slightly off-center or even ride toward the brim as a design choice. Vertically, aim to center the patch within the flat area of the front panel, which on a structured trucker generally means the bottom edge of the patch sits a little above the bill seam rather than resting right on it. Leaving that clearance keeps the patch off the curved transition where the panel meets the brim, which is the spot where lifting most often starts. These heights are practical guidance rather than a fixed measurement, and the safest approach is to place a paper cutout of the exact patch size on a sample cap before committing.
Give the patch breathing room on every side. A patch that runs to the panel seams or crowds the top of the crown looks trapped, and it also raises the risk of an edge landing on a seam. Keeping a margin of open fabric around the patch lets the shape read cleanly and keeps the attachment on flat ground. On a beanie, the same principle applies to the cuff: keep the patch within the folded band so none of it strays onto the stretchy body of the hat, where it would distort as the beanie flexes.
Specify it so the factory cannot guess wrong
When you place the order, give the patch dimensions in inches as width by height, name the exact blank, and state where on the hat the patch goes. A spec that reads, for example, three inches wide by two inches tall, centered on the front panel of a structured trucker with the bottom edge about three-quarters of an inch above the bill seam, leaves nothing to interpretation. If the shape is round, give the diameter instead. Providing artwork sized to the real patch dimensions, rather than a large logo file the shop has to scale, also prevents surprises, because a logo that looks balanced at six inches on a screen can lose fine detail when it is reduced to a two-inch patch.
Do this once and it pays off on every reorder. The combination of a size matched to the hat style, placement that respects how the cap is built, and a written spec that states both is what separates a leather patch hat that looks professionally made from one that looks close but slightly off. It costs nothing extra at the order stage and saves a round of samples later.