How a leather patch attaches to a hat matters as much as how it looks. The same patch can hold for years or peel after a season depending on whether it was pressed, sewn, glued, or some combination of the three, and on how well the method matched the hat. There are three attachment routes in common use, each with a clear sweet spot. This piece walks through what each one does well, the settings and tradeoffs behind them, and how to choose based on the hat and how it will be worn.
Heat press: fast, clean, and the default for volume
Most custom leather patch hats you see on a shelf were heat pressed. An adhesive film on the back of the patch melts under a heated platen and bonds to the fabric, giving a flat, professional finish with no visible stitching. It is the fastest method per hat, which is why it dominates any order above a handful of pieces. The catch is that leather and faux leather do not tolerate the same heat, and getting it wrong shows up as scorching, shine, or a bond that lets go.
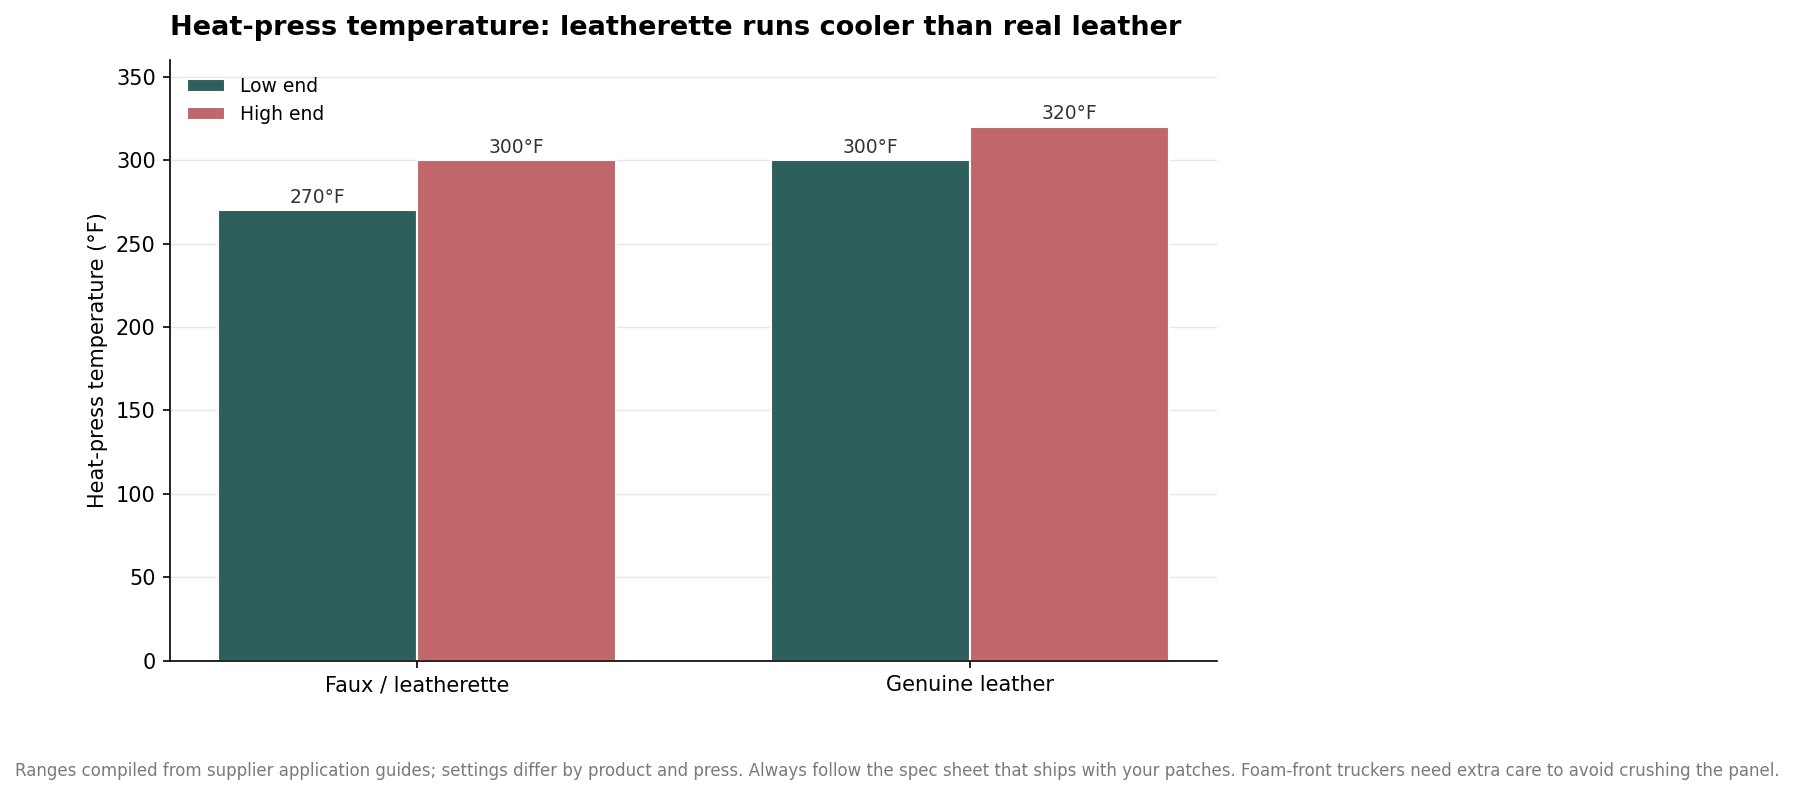
Temperature is the variable that separates a clean press from a ruined patch. Faux and leatherette patches generally press cooler, in the neighborhood of 270 to 300 degrees Fahrenheit, while genuine leather is usually run hotter, around 300 to 320 degrees. These are compiled ranges, not a universal recipe; the spec sheet that ships with your patches always wins because backings and finishes differ.
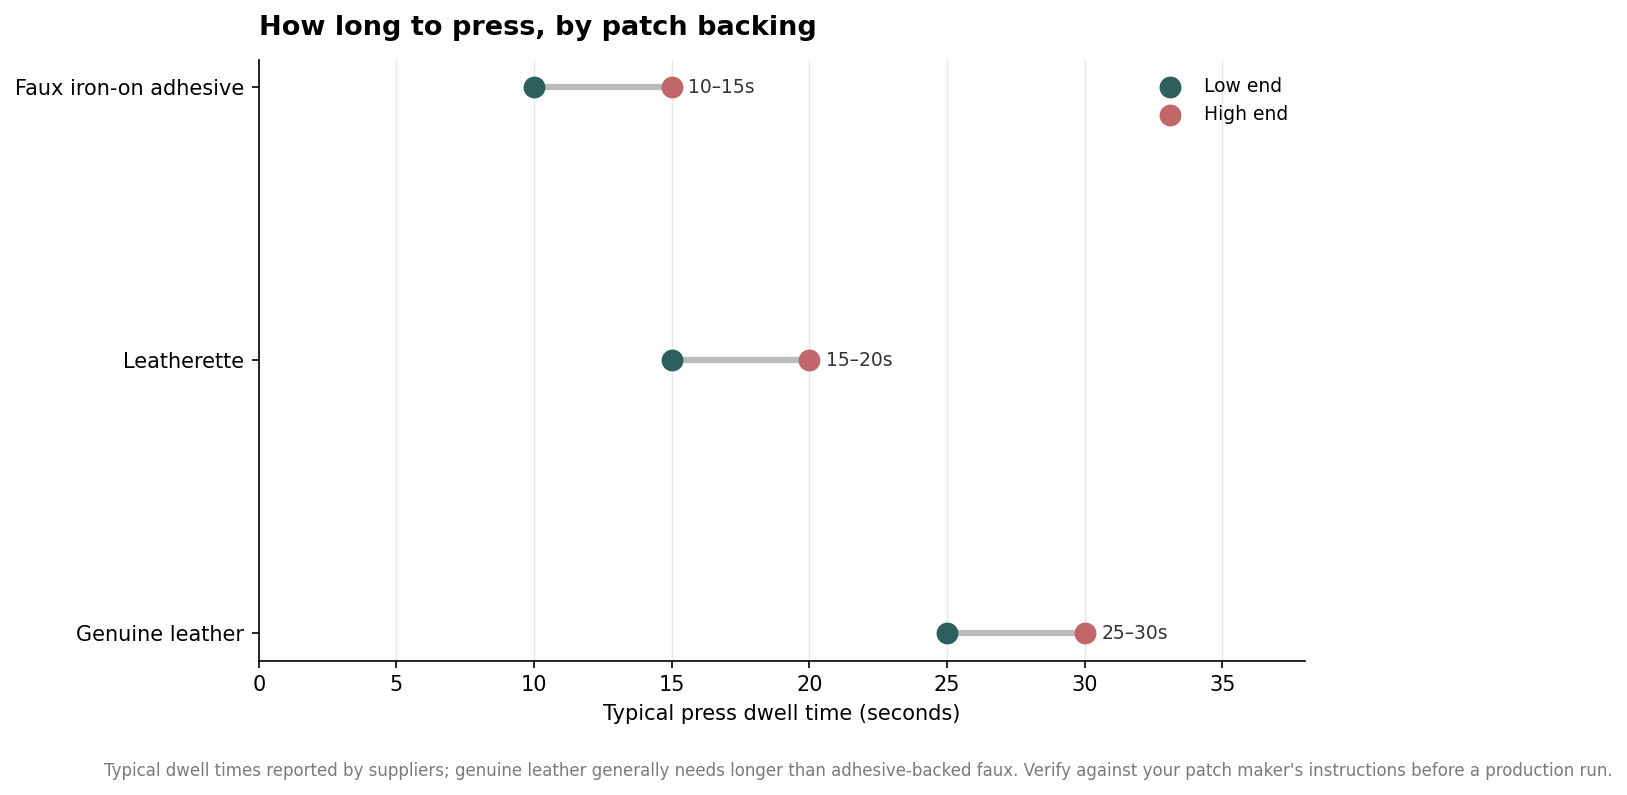
Dwell time follows the same logic. Adhesive-backed faux patches often need only 10 to 15 seconds, leatherette a little longer, and real leather commonly 25 to 30 seconds to fully activate the bond, followed by roughly 30 seconds of cooling before you test it. Pressure should be firm and even. The one place people get burned, literally, is the foam-front trucker cap: the foam crushes and distorts under too much heat and pressure, so those panels need a lighter touch, a cooler setting, and sometimes a heat-resistant pad behind the panel.
A cover sheet and a peel test are the two habits that save presses. Laying a thin Teflon or parchment sheet over the patch protects the leather surface from direct platen contact and the glazing or shine that can result, and it keeps any adhesive squeeze-out off the machine. After the cool-down, lift one corner gently: if it resists cleanly, the bond is set; if it lifts at all, a short second press usually finishes it. Because leather can scorch in seconds, it is far cheaper to confirm the bond on a test blank than to discover a bad setting halfway through a box of caps.
Sewing: the most durable, and the most forgiving of curves
Stitching is the strongest attachment and the one that shrugs off weather and washing. A sewn edge does not care whether the adhesive was activated correctly, and it holds up to the flexing, sweat, and laundering that eventually stress any glued bond. It is also the friendliest option for curved or seamed surfaces where a flat platen struggles to make even contact. The tradeoff is labor: each patch is stitched individually, which adds cost and time and is why sewing is more common on premium or lower-volume runs than on large promotional orders.
A frequent middle path is to heat press first for placement and a clean initial bond, then stitch the perimeter for security. That combination gives the crisp positioning of a press with the longevity of a stitch, and it is a reasonable request to make when a hat will see hard, daily use rather than occasional wear. It also hides a practical benefit: the press holds the patch perfectly still while it is sewn, so the stitch line stays straight.
Leather adhesive and glue: quick, but easy to get wrong
Purpose-made leather adhesive is the third route, and it is best treated as a small-batch or repair method. You apply a bonding glue formulated for leather, position the patch, and let it cure. It needs no press and no sewing machine, which makes it attractive for one-off projects and fixes. The downside is precision: there is no forgiving window to reposition once the patch touches down, and squeeze-out or uneven coverage produces a messy edge. Durability depends heavily on the specific adhesive and surface prep, so for anything you expect to wear regularly, glue is usually the weakest of the three.
Choosing the method for the hat and the wear
Start from how the hat will live, then work back to the method. For a large branded run of structured trucker caps that will be worn casually, a properly dialed heat press is fast, clean, and plenty durable. For a rugged workwear or outdoor hat that will be sweated in and washed, sewing, or a press-plus-stitch combination, earns its extra cost. For a single custom gift or a repair, leather glue can be the practical choice as long as you accept the tighter margin for error.
Two preparation habits improve every method. Clean and flatten the application area first so the patch meets a smooth surface, and test your process on a sacrificial blank of the same hat before committing a full run, especially with foam fronts or unusual materials. Once a hat is finished, care extends whatever bond you chose: air-dry rather than tumble-dry, since machine heat can soften a pressed adhesive, and spot-clean instead of soaking. Match the method to the hat, respect the material’s heat limits, and the patch will still be holding long after the trend that inspired it has moved on.